Recumbent seat webbing tensioning
A long entry today with heaps of photos because I've got a lot to say, and I've got a lot to say because I'm Dead Clever.
Alright. That was a fib.
In the event that there is still a reader - and I acknowledge that most will have died of old age in the gaps between my increasingly erratic posts - then it is as well to say that I am recording the following details for my own information. I don't often make seats so I forget the exact method I use, and since it's rather fiddly, here are the details to remind me for next time.
The business of recumbent building is largely hampered by not knowing what to do about seats, and this is the How. - The Why is that I find a framed webbing seat more adaptable than a solid seat. You can bend a frame to accommodate lumbar diversity. Solid seats need prior three-dimensional thinking to get right, and I'm a rubbish prior thinker.
I've tried all sorts of webbing, and I've tried all sorts of methods of weaving and tensioning it, and this is my best so far.
The cheapest webbing is car seat belts. You can obtain short lengths for free when people leave the belt hanging out of the car door. Your scissors need to be very sharp. Seat belts are strong and hard to cut. My seat belt webbing came as a huge roll, which I bought for almost free from Anchor Surplus, and because the roll was huge I tried a massive length interwoven between the side-frames, but it was next to impossible to maintain any tension. And seat belts are very heavy. Moreover interweaving doubles the length, and therefore the weight. So I prefer individual short lengths, each tensioned independently.
The webbing I currently use also came from Anchor Surplus. It's very light three inch wide nylon parachute harness. I expect you could get some of this for free too, if you had sharp scissors and were a deft flyer when the local Skydive business is active. During the summer there are any number of tourists jumping out of aeroplanes. I don't suppose a few would be missed.
Tension applied with a Spanish windlass is useless because the tubes sewn into the ends of the webbing eventually work loose and turn sideways, and then the webbing twists into a rope and becomes too long.
The only method I've found that's reliable is to stiffen the ends of the webbing with metal, and to use zip ties as the tensioner. Once tense they stay tense. The seat frame having an outside width of twelve inches, I cut the webbing to eighteen inch lengths, and seal the ends against fraying by passing them through the small flame on the propane burner. I use seven lengths - two for the base to take most of the body weight, three for the lumbar region to take all the pedalling thrust, and two for the upper back just to rest on. Using the spring-loaded tinsnips, which are my only sharp ones, I cut fourteen rectangles of 1.2 mm thick aluminium sheet. Each rectangle is 3 inches wide and 34.5 mm wide, and I don't care if you accuse me of Mixed Measurements and I don't care if I've just given two widths either. - Like I said, these notes are for me to read next year when I try to remember how to do the next one. - The edges of the rectangles have to be smooth so as not to cut the webbing. First the rectangles are beaten flat with a rubber mallet - the tinsnips curl the edges - and the corners rounded on the bench grinder. Quickest is to file the edges smooth in the vice with that fine triangular file, the obtuse one with the squiggly elmwood handle.

Each rectangle has to be folded exactly in half, a job fiddly beyond sanity when attempted in a vice. The way I've found to do this is by making a jig out of pear wood. (Ran out of apple.) (Didn't really. The pear was a handy scrap.)
The wood is machined flat. A rectangle 34.5mm by three inches is routed out to a depth of 1.2 mm plus 1/8 of an inch, or truthfully a bit deeper because the router isn't that accurate. A 1/8" slot is routed to a depth of 10mm along the middle to give the fold somewhere to go. This slot extends beyond the three inch mark at each end so a long piece of 1/8" wire - and hence the initial crease - will stay smack in the centre. The sides of the slot are chamfered away with a chisel to allow the aluminium to fold.

My wire-pressing-jig is a piece of one-inch, one-eighth angle iron 2.5 inches long. One side is cut off and welded to the other to turn it into a T section. On the sticky-out edge, a notch is carefully filed, and I can't remember how I did this but I do remember it was immensely difficult to file it. The notch has to hold a 1/8" wire without slipping off.

 Creasing the plate

A 3 inch long bit of 1/8 wire - straightened with a hammer beforehand, the ends rounded - is laid in the T-jig notch. The end of the webbing is draped over the wire. A creased aluminium plate is laid over the webbing. The whole is nipped in the vice, with both ends protruding.

I stick masking tape over the jaws of that red pipe-wrench-thingy that Eugen uses for pipe-tightening. The tape is supposed to stop the jaws marking the aluminium. It doesn't. The pipe-wrench-thingy is used to fold the aluminium over the webbing, hard onto the steel jig. The very ends of the aluminium are nipped sharply round the wire, but not so sharply that they cut through the metal, which they have done three times so far.

The T-jig assembly is taken out of the vice and the T-jig itself is removed, the aluminium/webbing/wire unit popped back into the vice, and the vice is tightened hard to nip the whole together as a unit.

Three one-eighth holes are drilled through the plate/webbing, the drill on high speed and pushed through onto a hardwood endgrain block, very quickly to minimise laddering of the webbing. The holes are drilled a couple of mm away from the crease so that the rivet head has somewhere to go. The holes are de-burred with a knife to give the teeniest countersink possible, and the whole is riveted together with 5mm-long rivets, pressing the pop-riveter hard against the carpet to keep the sandwich tight.
Another pearwood scrap is my chiselling block. This one has a ledge a millimetre deep routed onto it for the round part of the webbing end to rest on. Three little recesses are cut into the remainder to accommodate the rivets. The webbing end is rested on this, and two slots are chiselled through the aluminium plates, the slots being for the zip-ties. The ends of the slots are chiselled first, using a chisel ground from a Rawlplug chisel. The outermost edge of the slots go along the crease in the plate. These long sides of each slot are cut with that black 1/4" woodworking chisel that I don't use for woodwork because it's too thick.
 The chiselling block
 The edges of the slots are carved smooth with a knife, and then a red-hot bike spoke is run inside them to melt all the frayed webbing edges together.
Each end take ages to do. However, thereafter the zip ties, running through the slots, take out the whole tension onto the 1/8 wire, and the webbing stays smooth and taut for 4712 miles. So far. (It's still taut.)
I bet a production engineer could design a machine to do the job in five seconds flat. - Now does that mean the production engineer designs a machine in five seconds flat, or the machine produces webbing in five seconds flat? - The perpetual dangers of ambiguity.


Weighing everything separately: -
Frame: 2 lbs 11 oz
7 webbing strips with their end fittings: 10 oz
28 zip ties, 1.5mm x 7.5mm x 14.5 inches: 5 oz
The fittings to fix it on the bike: 16.75 oz
Minus 1.25 oz when you snip off the ends of the zip ties
Total seat weight: 4 lbs 9 and a half ounces.
 Yes, it's weighed in pounds and ounces. Tough.
Alright. That was a fib.
In the event that there is still a reader - and I acknowledge that most will have died of old age in the gaps between my increasingly erratic posts - then it is as well to say that I am recording the following details for my own information. I don't often make seats so I forget the exact method I use, and since it's rather fiddly, here are the details to remind me for next time.
The business of recumbent building is largely hampered by not knowing what to do about seats, and this is the How. - The Why is that I find a framed webbing seat more adaptable than a solid seat. You can bend a frame to accommodate lumbar diversity. Solid seats need prior three-dimensional thinking to get right, and I'm a rubbish prior thinker.
I've tried all sorts of webbing, and I've tried all sorts of methods of weaving and tensioning it, and this is my best so far.
The cheapest webbing is car seat belts. You can obtain short lengths for free when people leave the belt hanging out of the car door. Your scissors need to be very sharp. Seat belts are strong and hard to cut. My seat belt webbing came as a huge roll, which I bought for almost free from Anchor Surplus, and because the roll was huge I tried a massive length interwoven between the side-frames, but it was next to impossible to maintain any tension. And seat belts are very heavy. Moreover interweaving doubles the length, and therefore the weight. So I prefer individual short lengths, each tensioned independently.
The webbing I currently use also came from Anchor Surplus. It's very light three inch wide nylon parachute harness. I expect you could get some of this for free too, if you had sharp scissors and were a deft flyer when the local Skydive business is active. During the summer there are any number of tourists jumping out of aeroplanes. I don't suppose a few would be missed.
Tension applied with a Spanish windlass is useless because the tubes sewn into the ends of the webbing eventually work loose and turn sideways, and then the webbing twists into a rope and becomes too long.
The only method I've found that's reliable is to stiffen the ends of the webbing with metal, and to use zip ties as the tensioner. Once tense they stay tense. The seat frame having an outside width of twelve inches, I cut the webbing to eighteen inch lengths, and seal the ends against fraying by passing them through the small flame on the propane burner. I use seven lengths - two for the base to take most of the body weight, three for the lumbar region to take all the pedalling thrust, and two for the upper back just to rest on. Using the spring-loaded tinsnips, which are my only sharp ones, I cut fourteen rectangles of 1.2 mm thick aluminium sheet. Each rectangle is 3 inches wide and 34.5 mm wide, and I don't care if you accuse me of Mixed Measurements and I don't care if I've just given two widths either. - Like I said, these notes are for me to read next year when I try to remember how to do the next one. - The edges of the rectangles have to be smooth so as not to cut the webbing. First the rectangles are beaten flat with a rubber mallet - the tinsnips curl the edges - and the corners rounded on the bench grinder. Quickest is to file the edges smooth in the vice with that fine triangular file, the obtuse one with the squiggly elmwood handle.

Each rectangle has to be folded exactly in half, a job fiddly beyond sanity when attempted in a vice. The way I've found to do this is by making a jig out of pear wood. (Ran out of apple.) (Didn't really. The pear was a handy scrap.)
The wood is machined flat. A rectangle 34.5mm by three inches is routed out to a depth of 1.2 mm plus 1/8 of an inch, or truthfully a bit deeper because the router isn't that accurate. A 1/8" slot is routed to a depth of 10mm along the middle to give the fold somewhere to go. This slot extends beyond the three inch mark at each end so a long piece of 1/8" wire - and hence the initial crease - will stay smack in the centre. The sides of the slot are chamfered away with a chisel to allow the aluminium to fold.

My wire-pressing-jig is a piece of one-inch, one-eighth angle iron 2.5 inches long. One side is cut off and welded to the other to turn it into a T section. On the sticky-out edge, a notch is carefully filed, and I can't remember how I did this but I do remember it was immensely difficult to file it. The notch has to hold a 1/8" wire without slipping off.


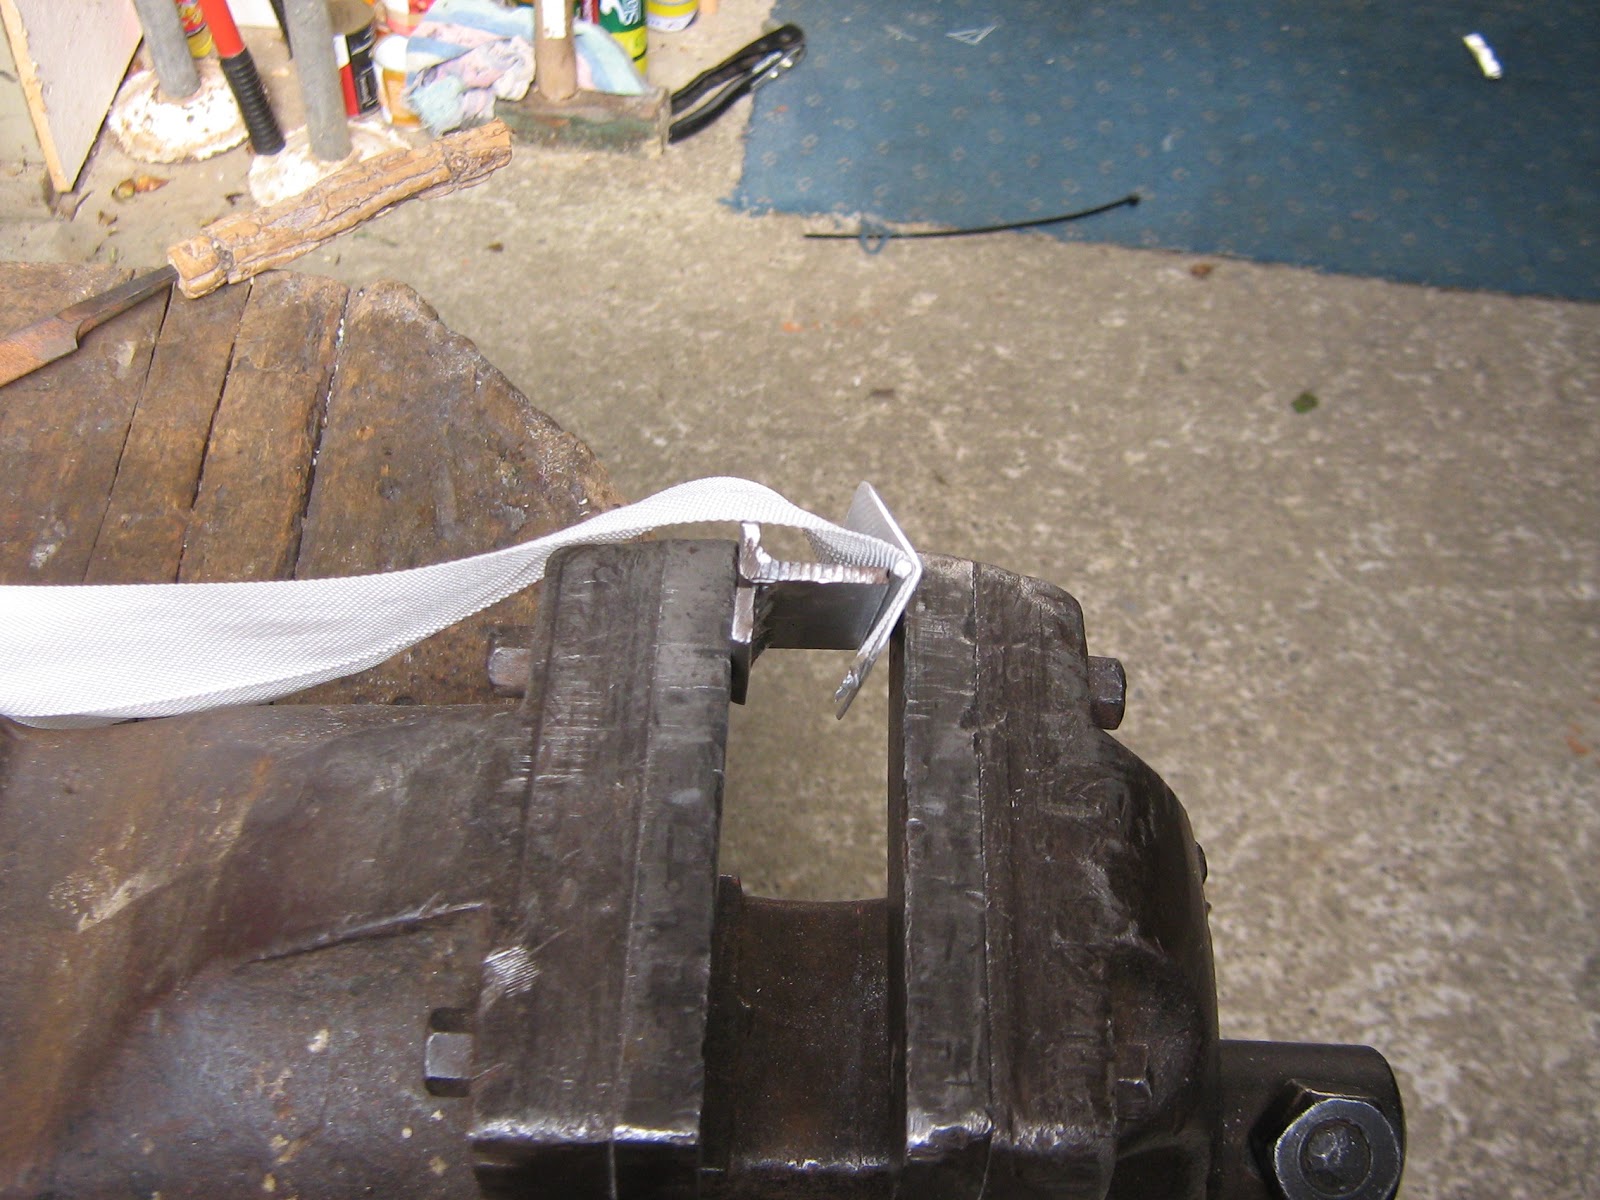
A 3 inch long bit of 1/8 wire - straightened with a hammer beforehand, the ends rounded - is laid in the T-jig notch. The end of the webbing is draped over the wire. A creased aluminium plate is laid over the webbing. The whole is nipped in the vice, with both ends protruding.

I stick masking tape over the jaws of that red pipe-wrench-thingy that Eugen uses for pipe-tightening. The tape is supposed to stop the jaws marking the aluminium. It doesn't. The pipe-wrench-thingy is used to fold the aluminium over the webbing, hard onto the steel jig. The very ends of the aluminium are nipped sharply round the wire, but not so sharply that they cut through the metal, which they have done three times so far.

The T-jig assembly is taken out of the vice and the T-jig itself is removed, the aluminium/webbing/wire unit popped back into the vice, and the vice is tightened hard to nip the whole together as a unit.

Three one-eighth holes are drilled through the plate/webbing, the drill on high speed and pushed through onto a hardwood endgrain block, very quickly to minimise laddering of the webbing. The holes are drilled a couple of mm away from the crease so that the rivet head has somewhere to go. The holes are de-burred with a knife to give the teeniest countersink possible, and the whole is riveted together with 5mm-long rivets, pressing the pop-riveter hard against the carpet to keep the sandwich tight.
Another pearwood scrap is my chiselling block. This one has a ledge a millimetre deep routed onto it for the round part of the webbing end to rest on. Three little recesses are cut into the remainder to accommodate the rivets. The webbing end is rested on this, and two slots are chiselled through the aluminium plates, the slots being for the zip-ties. The ends of the slots are chiselled first, using a chisel ground from a Rawlplug chisel. The outermost edge of the slots go along the crease in the plate. These long sides of each slot are cut with that black 1/4" woodworking chisel that I don't use for woodwork because it's too thick.


Each end take ages to do. However, thereafter the zip ties, running through the slots, take out the whole tension onto the 1/8 wire, and the webbing stays smooth and taut for 4712 miles. So far. (It's still taut.)
I bet a production engineer could design a machine to do the job in five seconds flat. - Now does that mean the production engineer designs a machine in five seconds flat, or the machine produces webbing in five seconds flat? - The perpetual dangers of ambiguity.


Weighing everything separately: -
Frame: 2 lbs 11 oz
7 webbing strips with their end fittings: 10 oz
28 zip ties, 1.5mm x 7.5mm x 14.5 inches: 5 oz
The fittings to fix it on the bike: 16.75 oz
Minus 1.25 oz when you snip off the ends of the zip ties
Total seat weight: 4 lbs 9 and a half ounces.

Labels: making a recumbent seat, recumbent seat, webbing, webbing end members, webbing tensioning, zip-tie tensioning, zip-ties
posted by richard middleton at
8:00 PM
1 Comments
![]()