Thursday, November 28, 2013

Alignment

To get the two half-boats to align and bolt together, I drilled four 6mm holes through both central bulkheads for some stainless steel bolts from the Channel Tunnel. - This is actually true. There was this bloke in Quorn mysteriously selling a large number of stainless steel bolts commissioned for the building of the Channel Tunnel, and I got a tin of them off him thinking that one day long in the future I would need them for something, and so it has now proved. My, I'm blessed with foresight.

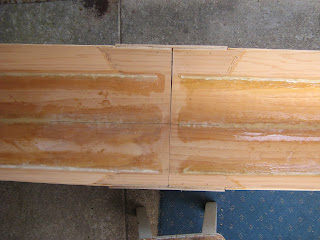
Having glued up both keel seams I was shocked and stunned to find that, when the thing was turned upside down, the two garboard strakes had become an aircraft carrier launch ramp. - No I wasn't, silly, I was anticipating that mishaps would occur as work progressed. - What had happened was that, being pretty supreme in the unintelligent department, I had imagined that the centre bulkheads would be adequate to align the bottom planks and that I wouldn't need to sew the latter together; and when I temporarily screwed in the bulkheads and glued the keel, a gap appeared and got glassed over. Hence the flare of the planks, which I would have photographed but didn't because
a) it was hard to see except in real life and
b) I forgot.

So I sawed mournfully down my new seam, and wondered how to prevent what would have been a horrid hydrodynamic cross-ridge right in the middle of the boat.

Eventually it occurred to me that I could screw some long planks on the bottom and use them to fix the two half-boats together, and the long planks would force things into line. And d'you know, this actually worked.


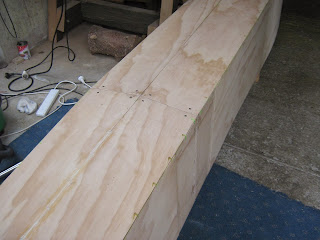
First some trimming of the sideplank ends had to take place to make the middle of the assembled keel the lowest point, and this meant cutting a triangle off the back of the sideplanks, the triangle being 15 mm wide at the top and 0 mm wide at the bottom. So I did that, and screwed the additional planks to the bottom of one boat-end, and very carefully sighted down the line of the two 'keels' to get them dead straight, and screwed them to the second boat-end, and then screwed a couple of short additional planks to the sides to hold them in right line.


Then I turned the whole boat over.

One side had a gap twixt front half and back half: the other was flush.


I measured the gap and it was a most convenient 4mm, so I made a third central bulkhead of 4mm ply to keep the two actual central bulkheads parallel, and in an amazingly difficult bit of larding glue all over the place incl. shirt trousers left arm and hair, managed to glue the two central bulkheads in place, using a sash cramp at the bottom until I was able to put in some temporary screws. This took more-or-less forever. Afterwards I discovered that Iain Oughtred is correct: you can clean epoxy off your skin with white vinegar and it's probably not as bad for you as cleaning it off with acetone.

 When the glue was reasonably hard I undid the four Channel Tunnel bolts and split the boat at the glueline, which wasn't all that easy because a lot of glue had seeped out and made contact between the two ends. The glue was brittle, which tells me to be wary of much flexing.


Then to prising off the intermediate 4mm bulkhead spacer, and angle-grinding most of the surplus wood and glue off.


Your proper boatbuilder will squeal with anguish at the angle-grinder confession but I am indifferent. Nobody will ever know because I finished the job with a cabinet scraper, and if you haven't ever used one, seven minutes of your remaining lifespan will show how and lend satisfaction to your every future bit of woodworking.


When all was done I bolted the ends back together and was relieved to find the boat dead straight from end to end.


And then it started raining and hasn't stopped, so no more gluing has taken place because I don't want to glue slightly damp surfaces together.

Labels: , , ,

Wednesday, November 20, 2013

Gluing

I had thought I would enjoy gluing since it seemed a delightfully swift easy and imprecise business. It isn't and I don't. It's surprisingly hard to find out how anybody else does gluing, so my method - thus far - is this, which will be a useful addition to the sum of human knowledge only until such time as my boat falls apart and I drown to death.

1. Gloves. You need an awful lot of rubber gloves. Disposable ones, latex. Not the thin plastic disposable ones: they don't mould to your fingers. And not kitchen gloves: they don't turn inside out easily. The game is to don gloves, commence operations, and the moment stickiness is detected on the fingers, peel the glove off by turning it inside out, and drop it on the floor. The glue is thereby contained inside the glove and will harden, and tomorrow you can turn the glove back outside-in by spinning it round on its own wrist, using the trapped air to squeeze all the fingers out. This I discovered courtesy of the Arthur Rickwood Experimental Station where rubber gloves were worn extensively, and where I learnt that blowing into the gloves to pop the fingers out results in a moist interior, which means you can't then get your hand in. - The most significant contribution that august body made to the cause of science. We are apt to over-rate our place of importance in the world, especially if a government research station. - If I remember correctly, there was a senior scientific officer there called Brian Tucker and daily another of the senior scientific officers took a felt pen and altered the spelling of the label on his office door. I remember this fact whenever I hear of a schoolteacher admonishing a teenager to act his age. - A certain teenager whose name I shall not mention is about to leave school, and has received a good deal of schoolteacher admonishment of late. His final prank a few days ago was to tell the local newspaper that he was a rugby player and that (quoting)  he singled out the Principal for his "inspiring speeches in assembly" which, against all the evidence, they believed and printed. - During the interview the reporter asked him what position in rugby he played, for which question he was wholly unprepared, and knowing only one position in a rugby team he declared 'hooker'. Afterwards we looked up hooker and found it to be the biggest, muscliest man in the team, not a spindly bespectacled boy with a head for calculus. Evidently the reporter isn't a rugby enthusiast either, since he printed the story intact. - Where were we? - Recycling gloves, that's where. - Gloves last three or four uses, I find.


2. Syringes. The epoxy requires accurate measuring of resin and hardener. I use a 20 millilitre syringe for the resin and a 5 ml syringe for the hardener. Each has a length of 5mm PVC tubing jammed onto the spout to reach the liquid towards the bottom of the canister. The used syringe is immediately put inside a sealed screw-top plastic jar, so it stays wet and uncontaminated, and later I use it again. As everything's hardening you find bubbles of air under some of the glass-fibre tape, and a 1ml syringe, having a small bore, allows high enough pressure to inject epoxy through a 1.6 mm hypodermic needle. Obtained by mugging a drug addict. - Actually this region doesn't do hypodermic needles, only cannabis, which one stumbles upon deep in the bush, a small clump of carefully weeded plants growing behind a fence of chicken wire to keep the feral goats out. I've happened on it several times in the National Parks. The police used to harvest the plants and do a large bonfire in the car park until the locals became too enthusiastic about yesterday's bread. - The police station is next door to what was the baker, and the car park was adjacent to the air intakes of their ovens.

3. Mixing. The resin is injected into a round plastic ice cream carton and the syringe put away. Then the hardener is injected on top of the resin and that syringe put away. Then a lolly stick is used carefully to mix the two together. Mostly I use 39 ml resin and 13 ml hardener and that's enough to keep me busy. Takes a couple of minutes to mix it. Mixing became easier when I abandoned the Thai takeaway dishes which had a ridged centre section. There's an army of plastic extrusion engineers out there making shapes more complicated than they need be and they ought all to be sacked. The mixed resin-and-hardener is a slightly viscous liquid. I use it raw (without fillers) to wet the fibreglass tape.

4. Tape. As instructed by everyone, I cut the cloth into tape on the bias (that is, all strands at 45 degrees to the length) so every fibre crosses the joint. At first I cut a single length of tape, but when wet with epoxy all the fibres turn into parallelograms and the tape became a rope 1.414 times as long and I needed a third hand to apply it, which I didn't possess. So now my method is to:
a) cut twenty pieces of fibreglass cloth, half of the pieces an inch wide, half two inches wide, all of them three inches long.
b) mix 39ml resin with 13ml hardener.
c) put the first bit of cloth in a Thai tray and paint it with epoxy till it's wet through. I use a stabbing motion of the brush, not a brushing motion which draws the fibres out and makes a mess. (Stabbing motion with a brush is called stippling, if you're the sort of person who knows what stippling means.)
d) put the next bit of cloth on top of that one, and again stipple it till wet with epoxy.
e) carry on till all the bits of fibreglass cloth are soaked through and piled on top of each other.

5. Glue. To make the epoxy into glue you have to use HT120 filler. Otherwise it's just a liquid without any body to it, and it runs out of the joints and leaves them starved of glue. I add a teaspoonful of HT120 and stir it in to make a very liquid glue and use the paintbrush to wet out the wood thoroughly and penetrate all the gaps between the seams making sure every bit of wood is wetted, and there's a healthy inch or so wet on either side of the actual joint. Work the wet under the fishing line. Then I squeegee it all as dry as is possible with my stippling brush, and this leaves about the right amount of glue.

5. Filling. To make filler you use HT450 filler. Both these fillers are fine white powders. I add filler to the remaining epoxy glue, half a teaspoon at a time, until the viscosity feels right. It needs to be stiff enough not to run out of the joint, with the appearance and consistency of a white putty.

Some of my fillers, the bits where I rounded off the inside gaps in between planks, have been a weird mixture of epoxy and HT120, HT450, and teaspoons-full of sawdust. This gives lots of body and appears to be pretty robust material when hardened. The pointy-bits of boat end are filled with this stuff.


I use Mini Magnum lolly sticks as trowels to trowel the filler into the joint. The children provide me with adequate supplies for which I am most grateful. The sticks are washed and dried, and the edge sharpened on a bench grinder. Lots of filler is poked into all gaps and under each of the nylon fishing-line bindings. Any wedges holding the planks in proper alignment have to be removed, glued, and reinserted wet, and this is a ghastly fiddly job because wet wedges go straight through and pop out of the other side of the binding, and you can't get hold of them because you've got wet gloves on, and you can't use a hammer to delicately tap them into place or the hammer handle gets wet and then you'll pick it up afterwards and get glue all over yourself.

When enough is trowelled along the joint, I use either the lolly stick or a piece of closed-cell polyurethane foam as a shaper. This is 6mm thick, 40mm wide, and cut to a semicircle. A single smear of the shaper works well. A second smear roughs everything up and you have to start again, dammit. Both of them seem to work equally well.

6. Tape. Next I lay wet, glued-out tape onto the filled joint. The first layer of tape is laid and pressed down gently into the middle of the filled joint with the fingertips, and then pressed outwards towards either piece of wood. Each short length of tape overlaps the previous one. When the first, inch-wide tapes are down a second layer of two-inch wide tapes are overlaid and pressed down. Wherever bubbles appear, I gently press the tape down with the tip of a lolly stick. And then, because I am rubbish at gluing, I notice a series of worrying white bits of fibreglass and these white bits suggest Glue Starvation inside the glass, so I frantically mix another 9 ml of resin and 3 ml hardener and a small amount of HT120 to make a runny glue, and stipple it into the joint.

7. Lastly, I remove gloves and with great care press strips of two-inch wide masking tape onto the edges of the seam. The masking tape holds the fibres firmly on the wood and allows me to press them home with my fingers. Several hours later it can be peeled off without removing any fibres and I'm left with a clean smooth feather into the woodwork.

8. This process takes about two minutes per inch of joint, and 39ml+13ml will do about 40 inches. Afterwards I wash the brush in acetone, which does actually clean it of epoxy, so I can use it tomorrow. I tip a little acetone into the mixing pot, wash the brush, dry the brush on a sock and put it to dry - the brush, not the sock - and use the sock to dry the mixing pot. And I don't touch any of the gloves on the floor till tomorrow.

9. Fascinating, wasn't it?

10. If you have a broken bicycle spoke on your desk you can twang it like a ruler and annoy everyone. This discovery is not material to gluing a joint of a plywood proa, but as I happen to have a such a spoke to hand, I thought I would kindly slip it in.


Labels: , , , ,

Wednesday, November 13, 2013

Fixing the bulkheads

New, big fat bulkheads made: 12mm thick, with 20mm softwood edges and a ring screwed and glued in place for the paint-bucket hatch covers. I screwed in the edges - chines? - fillets? - while the glue hardened, and realising that the screws add nothing to the strength of the joint, removed and filled the holes afterwards with epoxy.

Then to working out where to put them. I calculated that my lamentable inaccuracies of craftsmanship would o'erwhelm any calculations, and settled on placing the deck, and then fitting the bulkhead, and gently tapping the two towards the pointy-end until contact was made along all the edges. The decks needed a bit of chamfering for this to work: the front fifteen inches is chamfered, nothing more.


Then I drilled and screwed the deck in place starting from the pointy end. And then drilled and screwed the bulkhead in place.


Naturally I made a mistake, not pressing the bulkhead firmly down against the floor of the hull before applying screws, so a certain amount of removing screws, repositioning, and filling the holes up had to take place.  But as Palfrey once told me, the art of woodwork is that of hiding your mistakes.

And then I unscrewed and removed the deck, leaving the bulkhead where it would eventually have to go. From there is was a simple matter to remove it, apply lashings of glue, and screw it back into the self-same position.

While I was about it I removed all the brass screws from the deck and filled the holes. I can't think they will add any strength and the screws can get themselves recycled for all this extra fixing-things-in-place. The brass is soft and a good many of the heads get munted and now I wish I'd used steel ones, since they're turning out to be only temporary.

Labels: , ,

Tuesday, November 5, 2013

Bulkheads and deck

It has crossed my feeble understanding of how structures work that I shall need something to which to attach the outrigger. After gazing dolefully at it for a while I arrived at the conclusion that my flimsy 4mm bulkhead made of sub-standard plywood is not going to be especially good at conducting strains from the outrigger into the main hull. So I sat down at the drawing board and tried to work out what to do, and the simplest solution appears to be Thick Bulkheads. The bulkheads are surprisingly small when drawn full size, so they can be 12mm five-plies and still not impart excessive weight.


The boys at the timber yard, all of whom enter into any boatbuilding project with unfeigned enthusiasm, had pointed me at some test sheets, randomly selected during a production run, which have a foot cut off two edges to check that the inner laminates are all sound. There isn't much you can do with a seven-by-three sheet so they sell them off for $26, always to boat-building amateurs because everyone else is spending someone else's money and doesn't care what stuff costs.

I used a handsaw, since I've found I can't rely on circular saws and straightedges. And I plane afterwards to a sharp pencil line with a hand spokeshave, since it's more accurate than relying on an actual plane. Which I use with the confidence of knowing that ultimately the epoxy will fill any gaps, and further knowing that every joint will be reinforced with glass fibre, and yet further knowing that out at sea I care more about strength than appearance. I cut four bulkheads; two are for the middle of the boat and will meet and be bolted together to turn it into a long canoe. The two that seal the end decks stand proud of the putative deck and are to have short, stout solid hardwood beams attached to them. To these short beams I propose to attach the outrigger arms. I'm not yet sure how to make the attachment: over in Stephens Bay sits a waka, or outrigger canoe, for four people and I think it's the one I sometimes see a young family paddling of a Sunday morning. Here the arms are attached by nothing more than luggage straps. However a waka paddled on still water with two small children aboard isn't going to be subject to the stresses of a large sail in a lively sea.

In the last few days we had some warmer weather so I started gluing the deck together. I delayed while it was cold and rainy: I want my epoxy to go onto a dry surface, and I want it to harden in the sunshine. First things are the strips that will extend the glued area. I think these are called stringers. Mr. Dierking suggests cutting slots every three quarters of an inch, half-way through the stringers, to allow them to follow the bend of the deck. Did this with a blunt tenon saw, and don't recommend it. Took ages.


Then I went looking for copper nails and found none, nor any fine stainless steel screws, and I ended up with solid brass Phillips-headed woodscrews which were all that's available here. First lot of brass screws proved to be magnetic, and a file revealed a pathetic brass plating. They're only to hold things together while the glue sets, but thereafter they can remain and I don't want rust. Bronze would be better but asking for bronze screws provokes hollow laughter.

After thinking about the wood splitting I made a 2mm spade drill out of a galvanized bicycle spoke, and used it to drill pilot holes. Cheap spokes are high carbon steel and an underrated source of very small woodworking chisels. I even use them for carving or for scraping steel. Left dead-hard (heat to red and plunge in water) the edge is so small that you can sharpen them easily with a diamond file. What did we do before diamond files?

After gluing both surfaces, I started by screwing the pointy end with two screws before bending the stringer. It is a fiddly business and used up five pairs of rubber gloves, which I shall recycle now that I thought of turning them inside-out to let the epoxy harden. Even fiddlier was the attempt to fill all the slots with epoxy by shoving a knife-blade into each one, and I don't think this worked; I think there is only a smear of glue over the top and the slots are hollow, so I shall pretend this was a deliberate weight-saving plan. Tried using sawdust as a filler mixed with the epoxy, too. Not very successful: had to mix in some 'proper' filler with it, though the sawdust-plus-filler was very good at sealing the whacking great gap between the fronts of the stringers.

For the record, I'm using Epiglass HT9000 epoxy, and HT120 filler to mix the glue and HT450 filler to mix the filler, and Epiglass can now jolly well send me a voucher for this gratuitous advert because the stuff's Hugely Expensive. Resin and hardener are measured with two syringes that I keep, wet, in separate empty screw-top honey jars. Mixed with ice lolly sticks, in plastic Thai takeaway dishes. Drips on the floor cleaned up with acetone on tissue, after learning that acetone does clean epoxy.

And here is a 1935 film of making a steam engine. Not even mildly relevant, but it gave me 17 minutes of unalloyed pleasure.

Labels: , , , ,